FlowObjects Excel Add-in
How to install and load the add-in to your computer
Method 1 – Sideloading method on your PC
Note: there are links to the Microsoft website describing the Sideload process for other scenarios below.
- Create a new folder off of your root drive named:
exceladdin - Download and paste the manifest file into that folder
- Here is a link to the Manifest file: http://excel.addin.flowobjects.com/assets/manifest_production.xml
- Note: you will need to download and save the file. Right click in the window that opens when you click the link above and save the file. Move it from wherever you saved it to the
exceladdinfolder you created.
- Share the folder as a network share
- Right click on the
exceladdinfolder and select Properties - Select the Sharing tab
- Click on the share button
- You are sharing with yourself, so click the share button at the bottom of the window
- Select the
Nooption in the next window - Stop – be careful here.
- Open notepad
- Right click on the link and copy it
- Past it into notepad
- Fix the formatting to so that the link looks EXACTLY as it does in the Network Access window. Carefully check to make sure.

- Copy the properly formatted link from notepad
- Open MS Excel
- Click FILE ➜ OPTIONS ➜ TRUST CENTER ➜ TRUST CENTER SETTINGS ➜ TRUSTED ADD-IN CATALOG
- In the blank called
CATALOG URL, paste the link and click theADD CATALOGbutton - The link will show up in the window below with the
CATALOG TYPEbeing Network Share - Click the
Show in Menubox - Click
OK - Click
OKin the Manage Add-in Catalogs window - Click
OKin the Excel Options Window - Shut down all open Excel files and restart Excel
- Go to
Insertand click on theMy Add-insbutton - Click on the
Shared Foldersbutton - You should see the
FlowObjects SQL Serviceadd-in in the window - Click on the Add-in and click the
Addbutton. - You should now see the
FlowObjects SQL Runner FlowObjectsadd-in button on yourHometab over on the right of the banner. It should look like this:

- Click on that button and it will open the
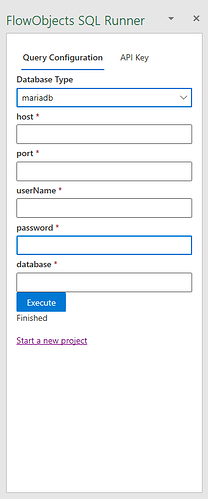
FlowObjects SQL Runnerwindow in the spreadsheet on the right side. It should look something like this:
- Right click on the
What an API Key is and why you need one
The API Key is what allows the FlowObjects Excel Add-in running in MS Excel to access the FlowObjects SQL Runner cloud service. This is a highly scalable environment that does the heavy lifting of executing your SQL requests on behalf of the FlowObjects Excel Add-in tool. To get started you’ll need to first create a login account on the FlowObject’s SQL Runner cloud service. Once you’ve created your account and are able to login, you’ll need to create the API Key that will authorize the FlowObjecs Excel Add-in to connect to your account.
How to create your account in FlowObjects and create an API Key
- Go to the following URL: https://sr.flowobjects.com
- Click the
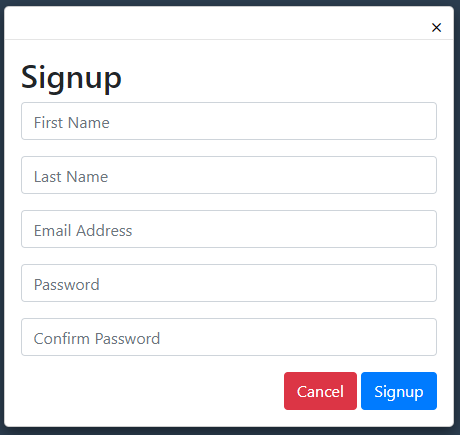
Signupbutton at the top right of the web portal and go through the process to create an account.
-
Once your account is created and associated email has been verified, Log on to the
FlowObjects SQL Runner portal -
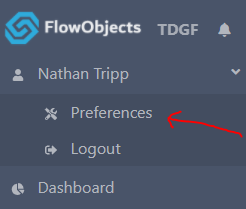
Click the expander / twistie icon next to your name and select
Preferences
- Click on the
Teamtab - Click the
Allow third party to access your team via APIbutton.

- Click the
Generatebutton and then the Save button. - Click the
Copy to Clipboardbutton to copy the API Key into memory
- Click on the
-
Go back to Excel
- At the top of the FlowObjects SQL Service window, click on the
API Keybutton
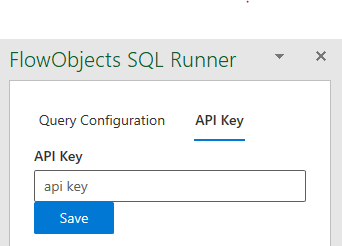
- Paste the API key into the blank and click
Save - Click on the
Query Configurationbutton up top - Ensure you have the correct information in the
Database TypeandAccount - Enter your
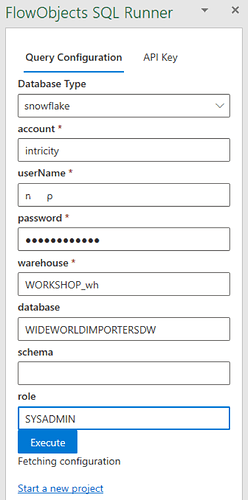
UsernameandPasswordfrom the Database you are connecting to. If you are accessing SnowFlake, it will be your SnowFlake username and password. - As an example, for the Wideworld Importers demo project we completed, this is what our configuration looks like:
- At the bottom of the window, you can click on the
Start a new projectlink to download a blank template with the necessary tabs to get started on a project. - Click the
Executebutton. If everything was done properly, you should see the tool processing queries. When it is done, it will sayFinishedat the bottom of the window.
- At the top of the FlowObjects SQL Service window, click on the
Link to Microsoft website describing the Sideload process: https://docs.microsoft.com/en-us/office/dev/add-ins/testing/test-debug-office-add-ins#sideload-an-office-add-in-for-testing
Here are some additional methods for loading an MS Excel Add-in tool from the Microsoft website:
Method 2 – Sideloading from a Network Share
Link to Microsoft website describing Sideloading from a Network Share: https://docs.microsoft.com/en-us/office/dev/add-ins/testing/create-a-network-shared-folder-catalog-for-task-pane-and-content-add-ins
Method 3 – Centralized Deployment
Link to Microsoft website: https://docs.microsoft.com/en-us/office/dev/add-ins/publish/centralized-deployment
Method 4 – SharePoint Catalog
Link to Microsoft Website: https://docs.microsoft.com/en-us/office/dev/add-ins/publish/publish-task-pane-and-content-add-ins-to-an-add-in-catalog
Method 5 – AppSource
Link to Microsoft website: https://docs.microsoft.com/en-us/office/dev/store/submit-to-appsource-via-partner-center
Method 6 – Exchange Server
Link to Microsoft website: https://docs.microsoft.com/en-us/office/dev/add-ins/publish/publish#outlook-add-in-deployment
